Thursday, 1 December 2022

Macedonian Army Part 12

I have been slowly plodding along with this little project, although there was a slight delay whilst I waited on another delivery of figures and decals.

I went with unarmed Greeks for most of my mercenaries.  I just like the different shield options that they can have.

I painted up enough to form either 2 large Phalanx or 4 smaller units.   Combined with the previous Mercenaries I painted up I now have enough to form the second line for the centre.


Wednesday, 16 November 2022

Ancient India Army

Addressing the Elephant in the Room.

The more astute amongst you may have noticed in the last photograph of the Macedonian army there were some rather out of focus Elephant bums.  This was intentional because they were nowhere near done.

I managed to sit down and get some work done on them over the last week before going to work and managed to get them to a point I'm happy with.

10 Elephants to lead my Ancient India army against the forces of Alexander.

This heralds the beginning of the India part of this project.


Saturday, 15 October 2022

Building A Blood and Plunder Town


Got there in the End.


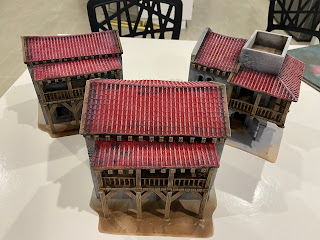
Well, I finally got there in the end and got these Blood and Plunder themed buildings to a usable state,


But as anyone who knows me can contest, I have this inability to just settle with small, when there is the option to go large.  So, I did a few more.

I am still waiting on a few more Palm trees to make small clusters of trees, but that's a really small amount of work to do and I didn't want to hold up this project any longer waiting for them to arrive.  I also want to add a small fence to one of the buildings, but again it's a small addition that won't take too long once I get the bits I need.  Certainly not worth procrastinating on these any longer that's for sure.

I really enjoyed painting these.  Terrain is my passion and I find it more relaxing than painting figures.

Anyway, for now, I'm calling these done so on with the next item on the list.


Friday, 2 September 2022

The Big Stocktake. Part 10

Starwars Legion.


Just a quick update for this one because these were on my radar to sell and sold really fast.

It's not that I don't like the game, I've just never played it!  and with so many other games out there it was not that high on my list of things to do.

All painted following the excellent Vlogs from John.

All up 54 Figures for the Empire and 52 for the Rebels along with a selection of terrain elements, also all painted.

Anyway, I'm crossing this one off as Done and Sold.


The Big Stocktake. Part 9

WW1 is Done


The decals for my German Tank arrived this morning so I wasted no time in getting them on the model.

I deliberately avoided going for a specific tank's markings and instead used decals from a combination of two different tanks.  I did this to avoid any die-hard WW1 fanatics pointing out that the camo scheme was wrong, or the tank was only ever at a certain battle etc.

I figured that I'm not really trying to recreate historical accuracy, just models to play games with.

Anyway, I am officially calling the WW1 collection done.


Building - A Blood and Plunder Town.

A place of ill repute.


I've started to paint the few buildings I have printed for the 'Blood and Plunder' section of this project.

I went with a really fast technique and managed to get these 3 building to through these 3 simple stages in a couple of hours at most.

I first primed them all with a light grey primer in a regular rattle can.

After that I used Army Painter Leather Brown and Army Painter Dragon Red spray cans to do the wooden areas and roofs.

The red was actually an after-thought, I originally did all the roofs brown before realising I had red spray paint in the garage.

You don't need to be too neat with this process and a little overspray won't hurt.

Any areas with a lot of overspray just quickly tidy up a bit with light grey.


I then used a dark grey through an airbrush to mark out some darker areas.  around windows and doors etc.  Again, don't worry about being particularly careful.  Check out some of the images and you'll see I got spray everywhere in some cases.

Most of this will get covered up during the next step anyway.


Next, it's time to get out a big drybrush.

I used two successively lighter brown tones to quickly drybrush the woodwork and two light greys for the main parts of the building.

For the roofs a quick pale red followed by a more cream colour.

This helps blend in all the colours ready for the next step, which unfortunately may have to wait for a few weeks as I am about to be sent on a short deployment with work.


I dry-brushed the door and window frames to help them stand out a bit more from the walls.  For this I just used a really light grey followed by a light drybrush of off-white.

I then gave the entire building a quick coating or army painter quickshade.  This not only adds an extra level of grime that helped give that lived in look to buildings but also adds a nice protective varnish.

The shutters and doors were all undercoated with leather brown spray paint before being dry-brushed lighter shades of brown until the top highlight was almost white.

I then used various Games Workshop glazes over the doors and shutters to create a weathered painted wood look.  Finally, I picked out the metal studs on the doors with some chainmail paint.

I assembled all the doors and shutters using thin wire to allow them all to open and close before giving the entire model a coat of spray matt varnish.

The next stages will be to add some detailing and do the bases.